Last year we created Frozen Pi, a rig to re-create the frozen time effect made famous by the Matrix. This year it’s “Reloaded” and improved, premièring on BBC Four as part of the prestigious Royal Institution Christmas Lectures.
We improved the hardware and the software, making the rig bigger, faster and snappier. We wanted to freeze people so they appeared to hang in mid air. Here’s a sneak preview from the rehearsal.
This year, the Royal Institution’s Christmas Lectures titled “Sparks will Fly; How to Hack Your Home” appealed even more to the engineer in me, as Professor Danielle George from The University of Manchester showed how anyone can use and adapt low cost technology to achieve extraordinary things. It was a great privilege to demonstrate the Frozen Pi rig at the Christmas Lectures, as for me and many families, they’re just as much a Christmas tradition as turkey, mince pies and outrageous knitwear. Setting the rig up, and standing in the centre of the famous lecture theatre, I did find myself thinking that Michael Faraday, father of electricity and creator of the lectures, must have stood on that very spot.
We made a number of improvements to last years rig including:
Custom CNC supports keep the rig level and at a sensible height
Capture people full height with a larger arc – means subjects can be more energetic
Improved debugging information
Faster fetching of images
Replaced NTP syncronisation with network multicast for faster setup
Testing the rig last year, we didn’t know whether it would work until we actually pushed the button to try it. And this year, with the new software it was just the anxiety. Would it work?
Huddled in the backstage corridor preparing to carry the rig out in front of an eager audience of excited children, and potentially millions of TV viewers it was quite tense.
You’ll have to tune in on BBC Four at 8pm to find out if it worked. We’ll post a behind the scenes after the programme goes out.
Some people said we were trying to build a Raspberry Pi time machine. In some ways they were right. Others compared it to the LHC at CERN and said we would warp time and space when they saw our pictures on Facebook https://www.facebook.com/raspberryPiFace. They were partly right too.
The Raspberry Pi Large Hadron Collider? It felt like we were building it.
And on the Friday night before the Jam it felt like we were building the LHC! With nearly half a kilometre of network cables, 48 Raspberry Pis fitted with cameras and PiFace Control and Displays we wondered if we’d finally been too ambitious with a project!
It started over 13 years ago watching when I saw the film The Matrix and a BBC documentary called Supernatural: The Unseen Powers of Animals. What linked the two programs was a camera effect where time would stop and the camera would move round the scene. I spent days trying to work out how the effect worked – I accepted that The Matrix used computer generated graphics, but surely the animals in a BBC natural history unit documentary had to be real? My faith in wildlife documentaries was reassured when I discovered a few years later how the effect was created.
The effect was called Bullet time, or Time-slice and consists of taking pictures from a long line of cameras at the same time, but playing them back one after another. Because all the frames are taken at exactly the same time, the action is frozen, but when the frames from cameras, each with a different view, are shown in order, it gives the effect of moving around a scene while time is frozen. On paper it seemed quite simple, to create a bullet time effect, you just needed a lot of cameras that would trigger in perfect sync. The camera rigs for TV and film are as impressive as the budgets, with tens of digital SLR cameras triggered by a slave cable. I could barely afford one DSLR camera, never mind twenty odd. Nor could I afford the tripods to mount them on! I thought my dreams of creating my own bullet time effect were simply unaffordable. That is, until I had an idea back in June this year.
PiFace Snap-Camera turns the Pi into an easy to build simple digital camera
I’d been working on a PiFace interface so I could use my Raspberry Pi without a keyboard and monitor. For a bit of fun I wondered if I could turn it into a simple digital camera, that would take a picture when a button was pressed, and to my pleasant surprise, discovered you could. An idea was beginning to form in my head. If I wrote a bit more code, instead of pressing a button to take a picture, I could trigger it remotely over a network. Furthermore, it cost a lot less than any other digital camera. Could the Raspberry Pi really recreate a bullet time style effect?
I have various crazy ideas, but normally they subside after a few days, but this one wouldn’t. I decided to buy four Raspberry Pi cameras to see if I could trigger them all at once. I laser cut a frame to mount them and it appeared to work, but with four cameras I couldn’t really tell how good the effect was. I decided to buy another four cameras, with the justification that if it didn’t work I’d either sell the cameras or use them in workshops I did with young people. Eight cameras showed promise but nothing conclusive, there was only one way to find out.
Sometimes you wonder if a project was a bit too ambitious
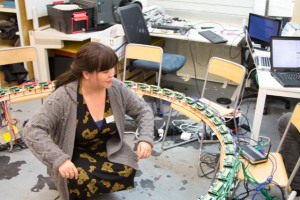
It’s a funny feeling carrying nearly 50 computers in a box barely big enough to hold a laptop. In contrast, after multiplying the original mounting frame by 12, I’d ended up with a 3m wide circle. This was when I first realised I was building something significant. After much plugging, wiring, mounting, and SD card package installing the rig was finally ready. It certainly looked impressive, particularly given it was wider than the office. As such, the first time we tried the full rig was the Manchester Raspberry Jam.
I’d mentioned to Ben Nuttall, general star, (soon to be working for the foundation) and organiser of the Manchester Raspberry Jam that I’d be bringing the Frozen Pi rig, but for some reason he didn’t automatically associate this with a 3m ring of 48 Raspberry Pis, half a kilometre of network cable, a few industrial network switches and enough power adapters to terrify most caretakers. We were generously squeezed into a corner of Madlab at the capacity jam.
A packed Manchester Raspberry Jam
Soon pictures of the rig were being posted on Facebook and Twitter, yet still we hadn’t actually tested the full rig. The first eager volunteer bravely strode into the circle. We pushed the button and the red camera lights came on in unison. A few moments later the first images had been collected over the network and were being stitched into a video. To everyone’s amazement, including mine, it actually worked! Raspberry Pi had frozen time, recreating a Hollywood effect for a fraction of the cost. You can see the results in the video above http://youtu.be/IqoA4HeBCQ4?t=2m19s
The setup wasn’t perfect – the floor in Madlab is characterful and the rig was a bit low, which meant sadly we chopped Liz Upton’s head off when she had a go. Despite this, we showed it was possible. We’d learned a few things along the way –booting and installing software on 48 Raspberry Pis needs a bit of work, and the PiFace Control and Display proved essential for debugging by showing what was going on, and allowing us to push switches to trigger actions and see status without plugging in a monitor.
Our patented support system was perhaps a bit low
The navigation switch on PiFace Control and Display allows us to set the index of the camera in the rig, so it makes it easy to build the rig in different shapes.
The rig generated a lot of interest and hopefully, in line with the aims of the Raspberry Pi foundation, has inspired youngsters to code and shown the computers can be used creatively. I could imagine an after-school club building their own rig with a class set of Raspberry Pi and cameras.
For those with just one Raspberry Pi, its still possible to play with time. Instead of freezing it with the bullet time effect it’s easy to speed it up with a time-lapse as shown in the previous blog post.
We’ve still got a few tweaks to make to it, but we’ve got loads of things plan to shoot with Frozen Pi. We’re looking for suggestions too! If you’ve got an idea, or want to see more videos get in touch via our Facebook page.
Tech Specs
For those of you interested in the gory techie details, here are the stats
48 Raspberry Pi Model Bs
48 Raspberry Pi Cameras
48 PiFace Control and Display
48 NOOBS SD cards
48 5V PSU
About half a kilometre of network cable
2 x 24 port switches
1 wireless router
Custom laser cut frame
Enough extension cables plugged into a single socket to scare most caretakers
Python script listening to receive command to take picture (included in snap-camera package) https://github.com/piface/snap-camera
Python script to collect images over network and assemble frames in order
Timeslice is a trademark of Time-slice films and Bullet time is a trademark of Warner Bros.
Finding myself shivering in a field I wondered what else this credit card sized computer would be responsible for.
I was testing my new time-lapse setup with Raspberry Pi, a camera and PiFace Control and Display. When I do talks to teachers about why they should use a Raspberry Pi I point out you can put it in places you couldn’t put a PC, and I was certainly following my own words as I trekked up a hill overlooking Manchester. I’d previously tried pre-programming a Raspberry Pi that I could leave on a hillside to take pictures, but found I needed to change settings in the field. Taking a keyboard and monitor out with me was impractical, and sometimes it was hard to know if the Pi had started taking pictures.
Youtube compression isn’t great and doesn’t do justice to how reasonable the Raspberry Pi camera is.
Using PiFace Control and Display I could easily set the time between pictures and how long the time-lapse should cover. This is useful as often before I start taking a time-lapse I don’t know how much I want to speed the action up by, or how long to keep taking pictures for until I’m ready to start taking them. The display shows when the camera has started and how much room there is left on the SD card. It makes it really easy to take time-laspse with the Raspberry Pi. So much so I think I’m addicted!
The software is really easy to install – just type
sudo apt-get update
sudo apt-get install python3-snap-camera
There’s a quick video walking though setting it up from scratch and showing another time-lapse in the city centre.
It’s opensource and available on github, so hopefully between us and the community we’ll get more settings for the camera added. We’re also wondering about re-writing it to use Dave Jones’ python libraries for the Raspberry Pi Camera, or adding features like scheduling the time-lapse to start at a particular time.
Enter our PiFace Control and Display Advent competition to win a signed copy of the new book, Raspberry Pi Projects.
We want you to create an application with PiFace Control and Display that counts down until Christmas (or any other day you prefer). It couldn’t be easier to get started – we’ve posted some sample code https://gist.github.com/thomasmacpherson/7684150 that you’re free to edit and remix. Once you’ve made your project, post a picture/video/link on our Facebook page http://www.facebook.com/raspberryPiFace and upload the code onto github.
Even if you’re new to coding and don’t feel ready to add complicated features, you can still enter by editing the festive graphics (they’re stored as bitmaps of 1s and 0s at the top of the program).
You might want to make your calendar interactive – revealing an icon of the day, or perhaps add sound effects. You could pull in data from the Internet, such as incorporating a Santa tracker showing how far away he is from, or showing the chances of a white Christmas with weather data.
The most creative and innovative entries will win a signed copy of the new book, Raspberry Pi Projects. We’ll also consider when you entered – so get your idea in early to be the first. Don’t forget if you can’t wait until after Christmas to get the book, you can also order it from Amazon!
Rules
Entries must be posted on Facebook page by 2359 GMT 24th Dec. Entries will be judged on creativity, innovation, fun and technical execution. The judges’ decision is final and no correspondence will be entered into. All entries must be your own work. Winners will be contacted by Facebook message and prizes will be sent by post as soon as possible after the closing date. Winning entries will be featured across social media sites.
I’ve just pushed the button to update the DNS around the Internet so in a few hours time our new website should go live. It’s been a lot of work, but we’re nearly there now. No doubt there’ll be bugs in it and we’ll tweak as we go, but once the infrastructure is in place, we can start uploading our tutorials. When the site goes live, this blog will have moved to http://www.piface.org.uk/iblog/
The result of about 10 months work, it’s a very easy to use LCD screen with buttons for the Raspberry Pi. The idea for it came from wanting to get more people using Raspberry Pis. The small size and low cost of a Raspberry Pi mean that you can put it where you wouldn’t put a normal PC. In my case, I’d been using it to monitor wildlife in a remote part of Wales. Although the Pi is credit card sized and low powered, monitors and keyboard aren’t.
PiFace Control and Display was designed to show the status of a Raspberry Pi without having it plugged into a monitor. It also has buttons that can be used to drive a menu so it is possible to interact with it.
I’d had the moment of inspiration when I wanted to build an Internet radio with the Pi to listen to. Obviously I didn’t want a big screen and keyboard so I came up with Control and Display. To make it even easier to control I added an infra-red receiver so I could change station from across the room!
Element14 interviewed me about it here:
I realised that there’s a whole raft of applications that need a way of controlling a Raspberry Pi and showing a brief status on the screen, and it was a great way to encourage youngsters.
As such, it was key to make it as easy to install as possible, and easy to program in Python. It’s one line to install, and two lines of Python code to print a message to the screen.
We’re also nearly ready to launch the new website — there’s a sneak preview below. I’d hope to post the URL in the next couple of weeks once we’ve finished testing.
While it’s great to see the coverage of children coding, it puzzles me why journalists set them apart from the rest of us. How many articles in the general media refer to ‘boffin’ or ‘whizz kid’?
On one hand it’s flattering, but on the other hand is it helping to proliferate the idea that computers are magic, or “I couldn’t possibly do it”. Take the latest video about YRS http://www.bbc.co.uk/news/uk-23663350. The opening line ‘Meet the next generation of computer programmers’ suggests to me that a label has been attached to the children, suggesting their chosen profession, not that for the next generation, we’ll all have to be able to program a computer. Just over half way though, there’s then a scene of panic, suggesting how complicated it is to learn to code unless you’re some sort of whizz kid. The video features participants in Young Rewired State, a movement to try and get more people using computers to solve problems.
I was a mentor at one of the 40 Young Rewired State centres that challenged your people to build a phone app or website in a week. All the centres met at the Custard factory in Birmingham over the weekend to see what had been made and to swap experiences and generally have fun.
The overall winner was Picycle, an app that indicated directions for cyclists with LEDs. Personally I was pleased it was recognised as I always love to see hardware hacking. And it was powered by a Raspberry Pi. I really want one!
While I was impressed by the knowledge shown by some participants, I was more impressed by those that had not coded before. By the end of the week, everyone in our group had done some coding and contributed to a new app. I found it an immensely positive experience, with everyone, adults included, learning something new. From the start we were taken aback by some of the young people reeling off their competences and discussing the technical merits of one language over another; clearly they’d spent a lot of time studying and practising their art. To me though, more inspiring was the nine year old and his sister who’d never coded before, yet by the end of the week had decided they wanted to spend the rest of the summer learning more.
Did they arrive at the centre as computer geniuses? No. They just had an open mind and a willingness to experiment and learn. Did all their code work first time? No, and I’m yet to meet a professional programmer whose code always does either. However, by the end of the week they’d beaten the bugs and they had made a website that was novel and a real need for. And above all everyone had a good time.
So, maybe rather than talking about computer whizz kids with some inherent magical techie powers, perhaps it’s more about recognising the hard work, determination and above all willingness to have a go. Maybe articles in the future wanting to grab the headline could use adjectives like ‘fearless’ rather than going for the stock set. That way, more people might realise, actually they can program!
I can’t believe it’s been a couple of months since the last post! We’ve been busy running workshops, presenting at Cheltenham Science festival, meeting teachers, staring on TV, as well as writing tutorials and squeezing in a bit of product development. We’re bursting to tell you what’s new, but will have to wait a few weeks longer. One problem we find is almost every week a new challenge pops up. So, our next challenge, how hard can it be to build a Pi powered ice cream machine?
You may have noticed the UK is experiencing a hot spell, and what could be more perfect for sunny days, than a Raspberry Pi and PiFace powered ice-cream machine! That’s exactly what Channel 5’s The Gadget Show have built. They use a PiFace to control the leds and the solenoid that operates a valve to dispense smooth, refreshing whippy ice cream. That’s the theory, and while the Pi and PiFace operated correctly, The Gadget Show didn’t manage to get their mix right, and sadly their contraption dispensed a dribbly mess.
We’ve reached a stage where computer control is easier that cooking! I’m really pleased to see PiFace and the Pi being put to work creating fun projects. The Gadget Show highlighted how easy it was to program Pi and PiFace in Python by pretty much anyone (including a TV presenter!). It’s exactly what PiFace was invented for!
So, how hard can it be? Inspired by Channel 5’s The Gadget Show I wonder if we can build something better? Maybe I could include a temperature sensor that will only dispense when the ice cream mix is ready? Perhaps it needs liquid nitrogen? I’ll post progress on the blog, but only after I’ve finished the tutorials, I promise!
 This year, the Royal Institution’s Christmas Lectures titled “Sparks will Fly; How to Hack Your Home” appealed even more to the engineer in me, as Professor Danielle George from The University of Manchester showed how anyone can use and adapt low cost technology to achieve extraordinary things. It was a great privilege to demonstrate the Frozen Pi rig at the Christmas Lectures, as for me and many families, they’re just as much a Christmas tradition as turkey, mince pies and outrageous knitwear. Setting the rig up, and standing in the centre of the famous lecture theatre, I did find myself thinking that Michael Faraday, father of electricity and creator of the lectures, must have stood on that very spot.
 Huddled in the backstage corridor preparing to carry the rig out in front of an eager audience of excited children, and potentially millions of TV viewers it was quite tense.
 You’ll have to tune in on BBC Four at 8pm to find out if it worked. We’ll post a behind the scenes after the programme goes out.